Note: Article contains affiliate links, meaning at no cost to you, I will earn a small commission on purchases made from these links.
This article gives insight into our camper electrical install using a dual battery electrical system (Lifepo4) and solar panels in our all terrain camper geared for overlanding. Our All Terrain Camper originally came with a battery as well as an isolator on our Bobcat Shell model. While this worked at first, we soon were wanting more from the system. Having a hassle free camper electrical install and setup was at the top of our to-do list.
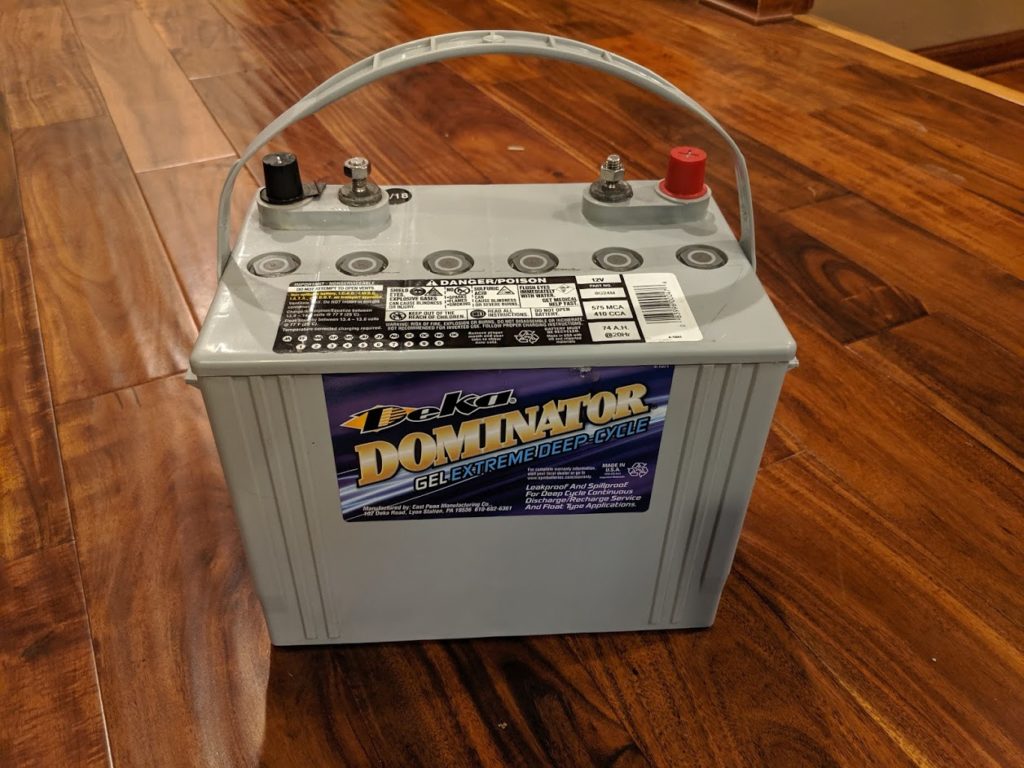
At first, the only power draw was the furnace when it was running and our Fan-Tastic powered roof vent. The battery the camper came with was a 74 Ah Deka Dominator deep cycle gel battery. This was enough to get us through a night or two with the furnace running.
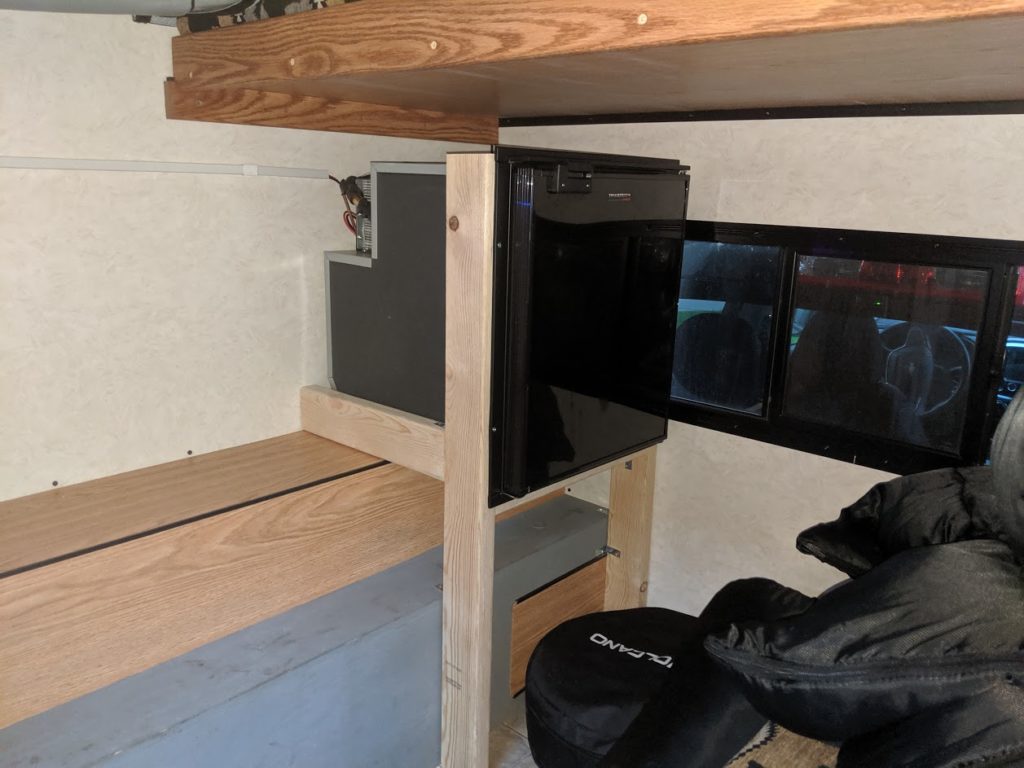
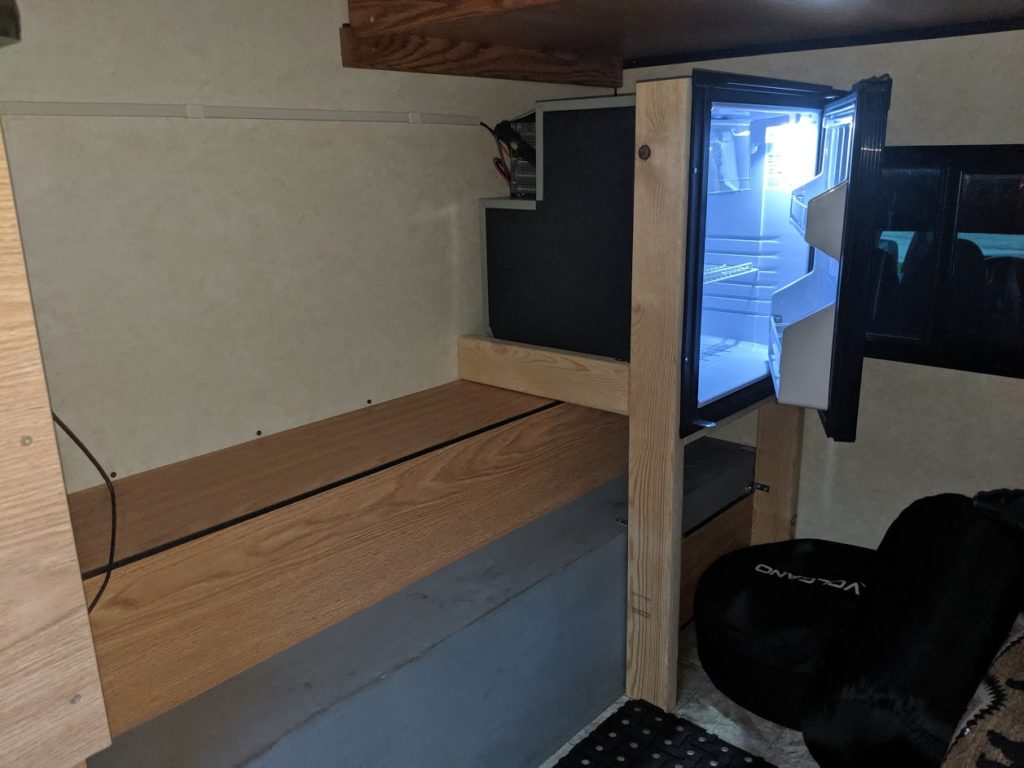
We started to run into issues when we stayed in the same place for more than a day or two. The only way to charge the battery was by running the truck or using shore power. Another factor in deciding to upgrade our electrical system to a dual battery is that we decided to add a Truckfridge TF-65 refrigerator. This ended up increasing our power demands significantly.
Thus we began the process of determining what camper dual battery electrical install upgrades we would do to meet our demands. These demands include: being able to power all of our equipment without discharging our battery to damaging levels; as well as never having to plug into shore power.
Choosing a Battery Monitor
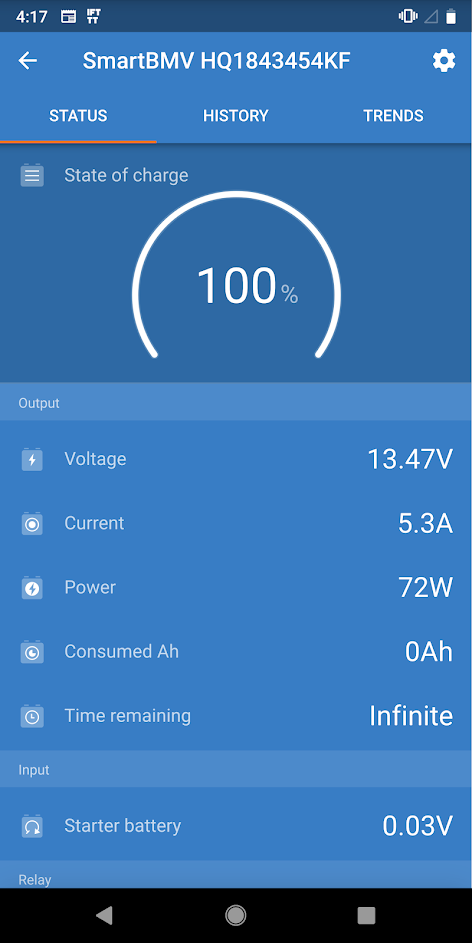
The first thing in order to get an idea of how much power we were using was to get a battery monitor. The monitor we decided to go with after researching and reading many reviews is the Victron BMV-712. This has been an outstanding upgrade to our All Terrain Camper electrical system and I absolutely love it. The monitor comes equipped with blue-tooth. It has its own app that allows you to check the battery status whenever you are near the camper. It shows the state of charge of the battery, as well as current in and current out. The techie in me loves being able to see how our system is doing by looking at the app.
Additionally, the monitor was also very easy to install. It was basically just a couple wires to the camper battery and it was up and running. It comes with a monitor that can be mounted anywhere you like; but I decided just to mount ours in the battery compartment inside a small project box. I can then monitor it through the Victron app. This allowed for an easy trouble free installation in our all terrain camper. Having the Victron BMV-712 has proven to be essential to our camper electrical install.

The Downfall of our Current Battery
After the Victron BMV-712 was installed, we received and installed our Truckfridge TF-65. After a night camping it became very clear that we were going to need a battery that could provide more amp hours to make it through the night without significantly reducing the battery life due to discharging too far. Fortunately, we were in a state park campground with hookups. For the time-being I was able able to plug a battery charger in to keep us up and running.
So now came the task of researching what battery to upgrade to. I wanted a battery that would allow us to draw more amp-hours without risk of damage. Another priority was to ensure the setup remained light weight keeping in mind that this is a truck camper on a Chevy Colorado that is already getting close to the max payload rating.
I looked into getting a matching 74 Ah Deka to pair with our current battery. This would get us 148 Ah worth of batteries. If you follow the general rule of thumb that it is safe to discharge lead acid batteries to 50% then we would have 74 Ah of useable battery.
This option would end up costing approximately $250 with shipping to get one as there are no local distributors here in South Dakota. It would also add another 52lbs to the weight of the camper as well as take up more room. I would also like to have more than 74 Ah available as well. These were all drawbacks that I did not like or want to deal with. I knew there had to be better alternative for our camper electrical install.
Battery Options
Now that we headed down the rabbit hole, things might seem to be starting to spiral out of control, but it will all be worth it when we knew we would end up with a fantastic dual battery setup for our camper that should provide many years of trouble free performance. With the drawbacks of adding a second lead acid battery in mind, I began to look into LifePo4 batteries. LifePo4 batteries have many advantages over lead acid batteries. The key ones being that they are lightweight and that they can be discharged down much further than lead acid batteries without damage.
A 100 Ah only weighs ~30lbs and some manufacturers say you can use 100% of the Ah with their built in safeties. There are a few companies that now offer drop in replacement LifePo4 batteries. Battleborn Batteries and Renogy are a couple of these companies. These batteries come with a Battery Management System built into them that protects them from things like overdischarge, low/high voltages, or out of range temperature conditions. LifePo4’s do have a couple drawbacks compared to lead acids.
The first and most obvious drawback is that they are quite expensive in comparison to lead acid batteries (but not when you look at the positives!). The second being that LifePo4 batteries cannot be charged in below freezing conditions, but they can be discharged in below freezing conditions. So, if you’re trying to charge a LifePo4 below freezing, it’s not going to work because the BMS won’t let it charge.
I don’t think this will be an issue for us as we keep our battery inside our all terrain truck camper and it will be rare that we would be trying to charge it in below freezing conditions.
LifePo4 Battery Upgrade
With all that being said, we ended up purchasing a 100 Ah LifePo4 from Battle Born Batteries out of Reno, Nevada. Battle Born says you can use the full 100 Ah of this battery, it’s a drop in replacement, and only weighs 31lbs. They advertise these batteries having approximately 75-80% battery capacity remaining after 3000 cycles and they come with a 10 year warranty against manufacturing defects. The only modification we had to make to fit the new Battle Born was to install a larger battery box inside our camper because the box it came with was for a group 24 battery and the Battle Born is a group 27. This battery should last us many, many years, and further reduce the cost difference between LifePo4 and lead acid.
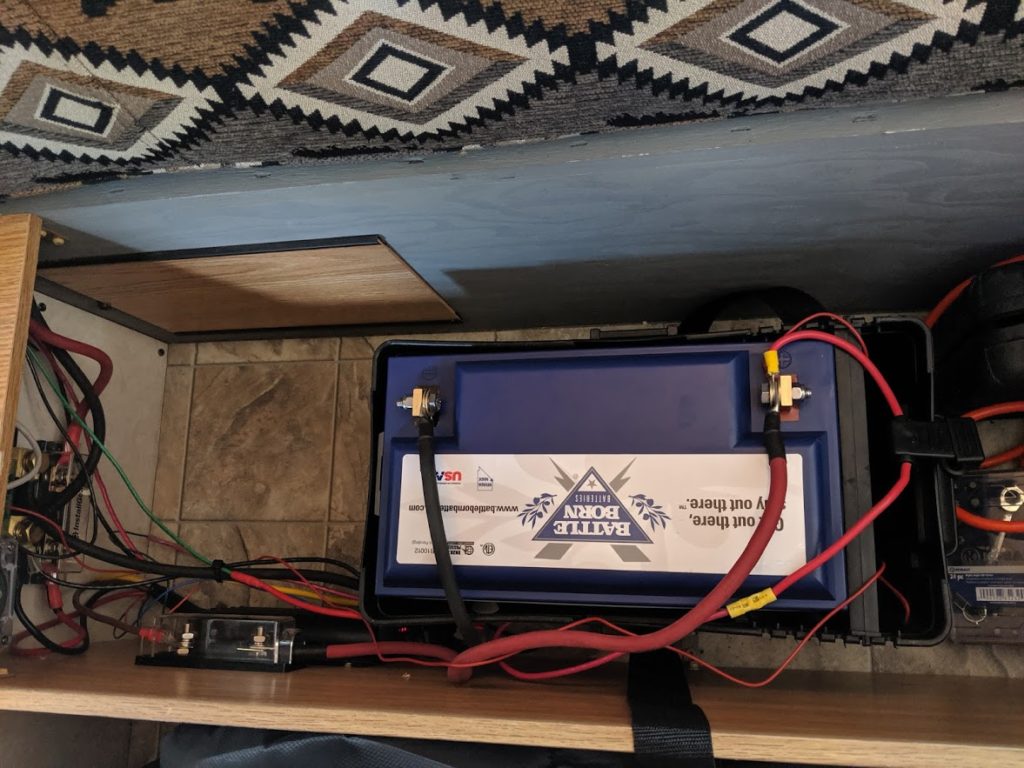
Charging the LifePo4
After making the decision to purchase a LifePo4 battery, it was now time to figure out how we were going to keep the new battery charged. Battle Born claims that you can use just a regular battery isolator like our camper came with in order to charge the LifePo4. This seemed like a great option until I realized that my trucks alternator was only able to charge the old 74 Ah lead acid 10% after an hour and a half drive.
I also know that LifePo4 batteries have different charging preferences than lead acids, so I began looking into different options that could charge the battery faster while the engine is running as well as provide a correct charging profile for the Battle Born LifePo4. I decided since my 2015 Chevy Colorado has a ‘smart’ alternator or a ‘variable voltage’ alternator that reduces the voltage it puts out in different situations to save on fuel economy, that a DC to DC battery charger would be the best option.
Choosing a DC to DC Battery Charger
I did explore the more standard and recommended option of a Blue Sea ML-ACR setup, but I decided after piecing together all the parts for an install like that and it not being capable of providing the correct charge profile, the DC to DC charger would be the way to go. A DC to DC charger is capable of supplying a large amount of amps to the LifePo4 in the camper as well as take the role as the battery isolator, and if you get the right one, it provides a LifePo4 charging profile and the exciting extra feature of being an MPPT solar charge controller all wrapped in one. This definitely seemed like the best way to go for our camper electrical install.
There are not many options to choose from in DC to DC battery chargers that met our requirements, but the Redarc BCDC1240D seemed to tick all of our boxes so we went ahead and placed an order for one.
The Redarc BCDC1240D is a 40 amp in-vehicle DC to DC battery charger designed to keep your auxiliary battery charged and topped off when driving and parked when used in conjunction with solar panels. It has 4 charge profiles to choose from including one for LifePo4.
Installing the Redarc BCDC1240D
The installation was very simple only requiring power and ground from the truck. Unfortunately our truck camper was installed with 10 awg wire ran from the truck starter battery to the camper, so we upgraded to 4 awg which is the largest maximum size recommended by Redarc for the length of our wire.
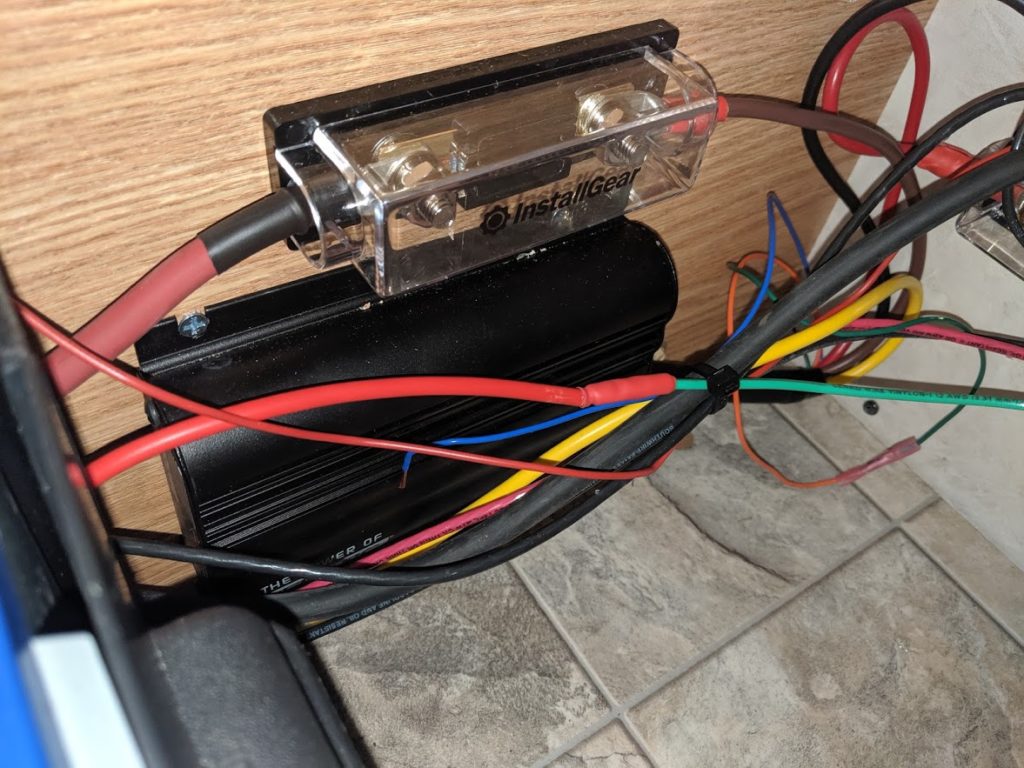
Upgrading the wiring for our camper electrical install wasn’t too bad, but it did require some planning and work to get it installed. We had to have larger fuse holders capable of fitting 4 awg wire. Install Gear fuse holders from Amazon were purchased as well as 60 amp fuses to go in them. We also upgraded our plug from the truck to the camper with an Anderson SB120 powerpole. This plug accepts 4 awg wire and is capable of handling more than enough current for the new Redarc charger.
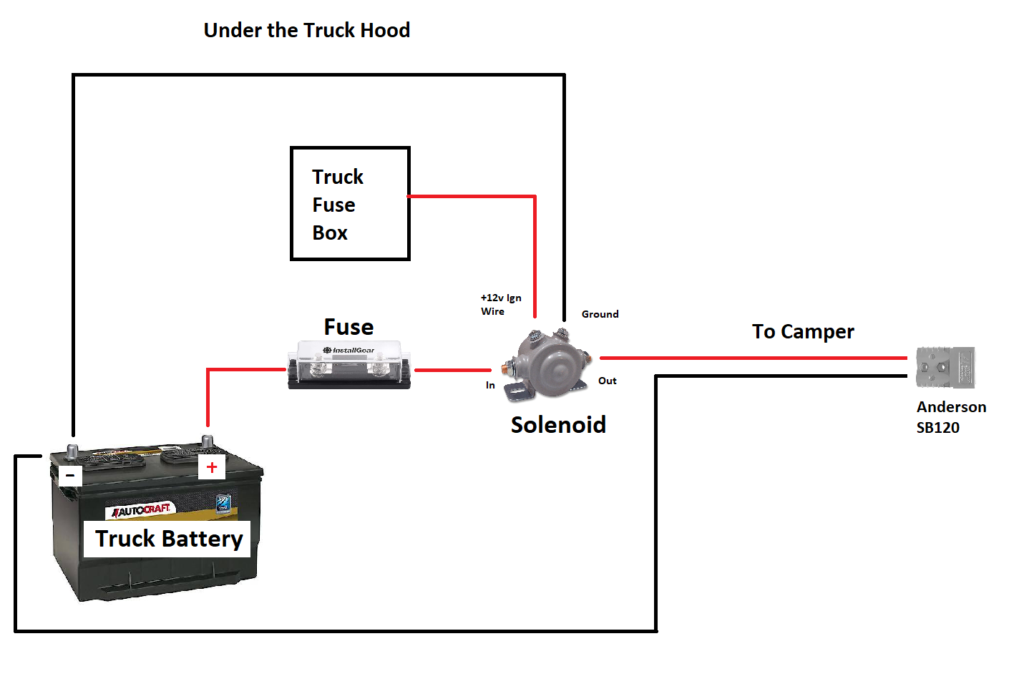
We also had to add a continuous duty solenoid under the hood of our Chevy Colorado in order to trigger the Redarc’s low voltage triggers due to our variable voltage alternator. Our alternator often drops down to just 12.6 volts and the Redarc cuts off at 12.7 when it does not have the low voltage trigger connected. With the low voltage trigger connected it will charge when it senses more than 12.0 volts of input but only when the truck is running with the way I have it wired through the solenoid. The solenoid we chose is a Cole Hersee 24117 which is rated at 85A continuous.
With the 100 Ah LifePo4 and the Redarc DC to DC charger, we are getting really close to meeting our needs for our camper electrical install. But what if we are in one place and not driving around for more than a day or two? How will we keep that new battery charged up?
Decision To Go Solar During our Camper Electrical Install
That brings us to our final chapter in our electrical upgrade journey. Adding a solar panel! After spending the amount of money we had already and wanting to take full advantage of our Redarc’s capabilities we began looking into options for a solar panel. There are rigid and flex panels available on the market, both with their advantages and disadvantages.
I would have really liked to have gone with flexible panels for our camper electrical install due to their light weight and low profile design. Unfortunately, I read many horror stories of them failing prematurely when adhered directly to the top of a camper/rv.
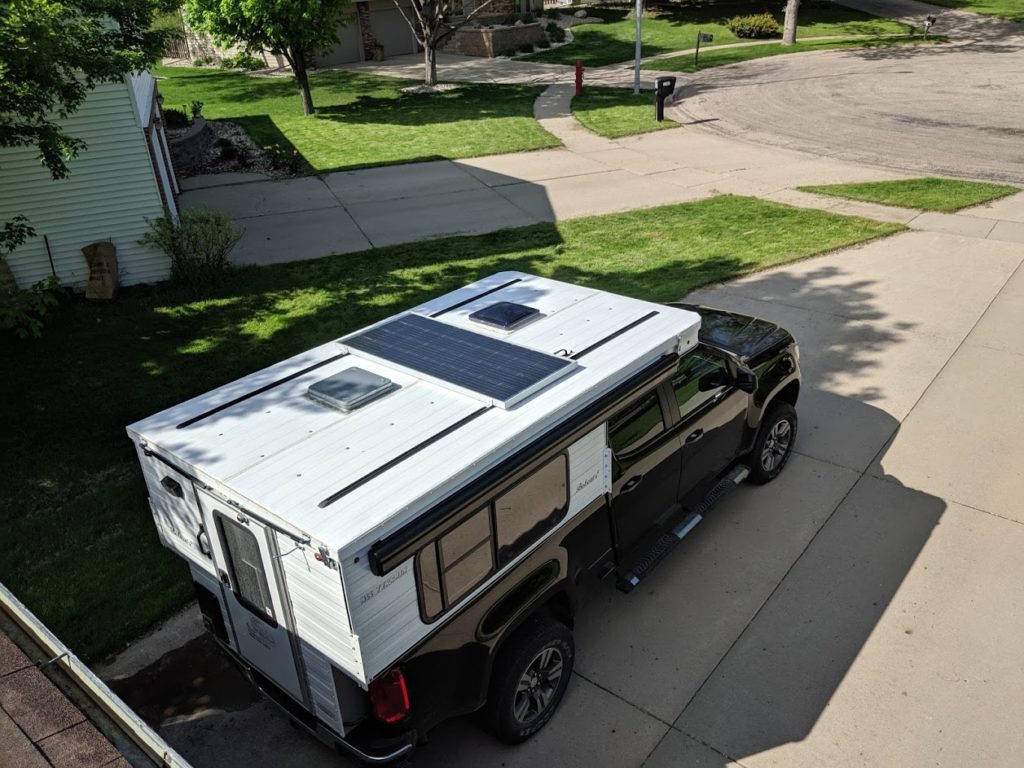
The failures are said to be a result of excess heat because air is not able to flow under the panels. For our camper I decided to go with a rigid panel. I liked the idea of an easy installation as well as being able to remove it if I wanted without having to chisel off some sort of permanent epoxy like the flex panels have. Our All Terrain Camper came optioned with full length Yakima tracks on the roof. Given this, it was easy to add a solar panel to it as long as it spanned the width of the tracks.
Picking the Right Solar Panel
In my research I found that most rigid solar panels are the same dimensions. In turn there are really not that many options to choose from. 100 watt panels are common but these are small for our application. We ended up looking at 160W and 175W panels that are common on the market.
I thought I was going to settle for a 160W panel from a reputable manufacturer until I stumbled upon HighTec Solar Inc. These panels are sold primarily through their eBay store which goes by the name, fred480v. HighTec Solar offers a 200 watt +25% solar panel for $200 on their eBay store. They claim this panel to be American made and that it is the most powerful panel made today for RV’s. After reading reviews of the HighTec Solar panel we decided to take the plunge.
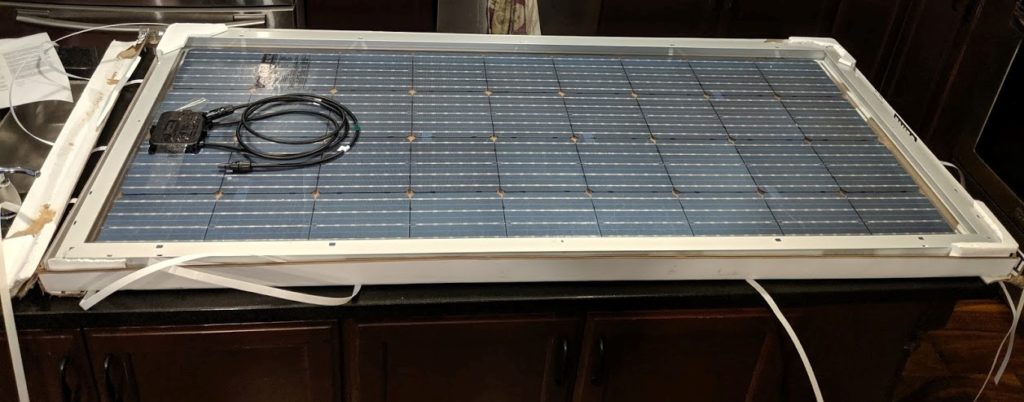
This HighTec Solar panel has an interesting feature that I have not seen in other solar panels. The back sheet is clear, so sunlight can be collected on the front of the panel, but the back also. Light can go through the face, reflect off the roof and then is captured by the back of the cells. This is where the claim of +25% comes from. We are definitely looking forward to how this panel performs in all weather conditions.
Mounting the Solar Panel
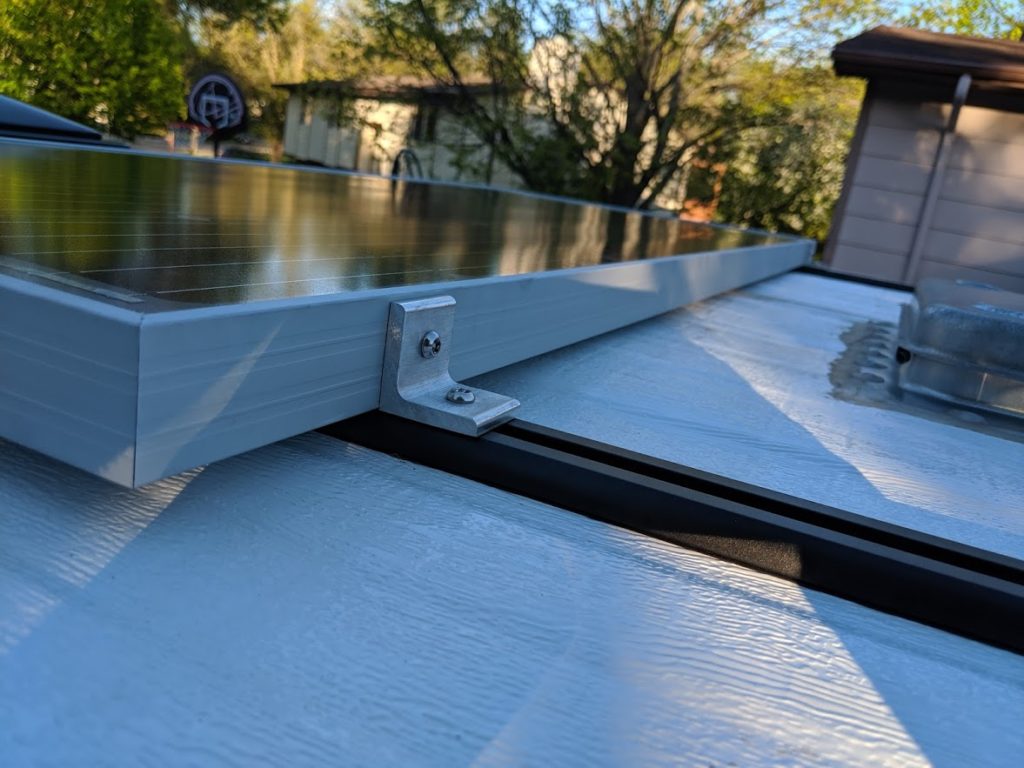
Mounting the Hightec Solar panel to the All Terrain Camper was surprisingly easy. After ordering a 12″ piece of 1.5″ x 1.5″ x .25″ thick aluminum angle, I cut it into 4 1.5″ lengths. I then drilled a hole in each side of the 4 sections to create 4 mounting brackets.
We then used 4 Thule Tracker nut plates to fit into the Yakima tracks to bolt the mounting brackets to. Lastly, I placed the panel on the roof and marked/drilled 4 holes for the mounting brackets.
The All Terrain camper comes pre-wired for solar installing. It has a plug on the roof, so I just needed to get a MC4 to SAE connector to connect the solar panel to the plug. From there all you have to do is connect the wiring that is coiled up in the camper’s battery compartment. Positive to the Redarc solar input and negative to ground. Always make sure to check the polarity with a multi-meter. I believe that solar will be one of the most worthwhile upgrades to the all terrain camper. I can’t wait to see how it performs!
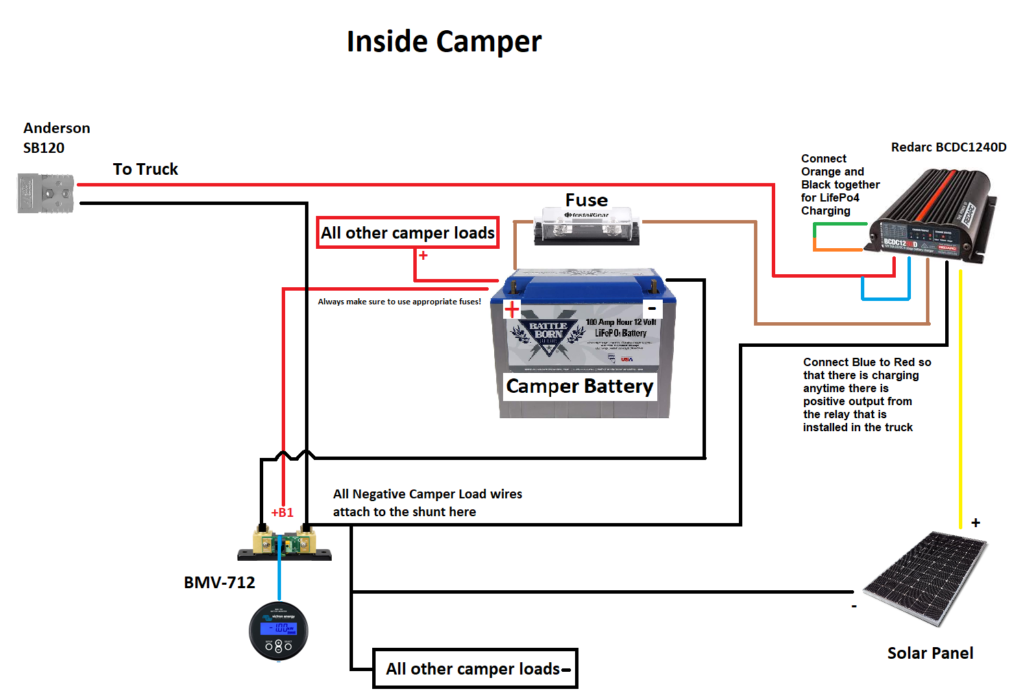
Wiring Diagram
Here is how I wired our setup. Yours may vary, but in general if you use the same components it should be similar to this.
Finalizing the Camper Electrical Install | Parts Used
That is everything we have done for our electrical upgrades in our All Terrain Camper. All this would be applicable to anyone wanting to add a second battery to their vehicle. We believe this is the best way to go for a camper electrical install. We hope our explanation/justification for our component choices makes sense to you as well.
List of parts:
Battle Born 100Ah LifePo4: https://amzn.to/2pYpnc2
Redarc BCDC1240D: https://amzn.to/369ELD3
HighTec Solar 200+25% Watt Solar Panel: https://www.ebay.com/itm/200-25-Watt-12-Volt-Solar-Panel-Off-Grid-RV-Boat-highest-power-12V-you-can-buy/283444507344?hash=item41fe9bf2d0:g:GMAAAOSwbWZacTa~
Truckfridge TF-65: https://amzn.to/2Pk9iIy
Victron BMV-712: https://amzn.to/2pkElJv
InstallGear Fuse Holders: https://amzn.to/2PnUwAv
4 Gauge Wiring Kit: https://amzn.to/2Jv1jV9
MC4 to SAE Adapter: https://amzn.to/2qNIvKh
Thule Tracker Replacement Nuts: https://www.rerack.com/thule-tracker-replacement-nut-plate-8532106/
Many more tidbits like wiring, crimp connectors, heatshrink, etc..
Thanks for reading! Please leave a comment below if you have any questions or would like to know more.
Thanks for the really great writeup. Came here from Wander the West. I just might follow your directions EXACTLY as I’m pretty slow on electric stuff.
Awesome! Thanks for the comment. Let me know if you have questions about anything.
Did you disconnect the stock charging from your 7way (umbilical cord) from the truck to the battery?
The camper was wired by ATC directly from the camper to the trucks starting battery with 10 awg wire that they ran. I completely removed that wiring to install the new larger wiring. The 7 way was not touched.
Thanks for this helpful description of your new system – got a couple of questions
1. Is there a reason that you used Thule tracker plates instead of the Yakima plates with your have Yakima racks?
2. with the refrigerator and whatever else you have in your camper – does the single 100Ah battery suffice?
Hi!
1.The reason I used the Thule Tracker plates was because they simply drop into the tracks and then twist into place. With the Yakima nuts you have to take off the end piece of the track to slide them in. I’m not sure how difficult that is as I have not tried.
2. Yes. We have the fridge, the propane heater, and the powered roof vent. We also charge a couple phones at night. With everything running on a cold night where the furnace is cycling on and off all night we use a max of 60Ah. If its warmer then we won’t use as much. With our solar system and the amount we drive each day, our battery is able to be topped off during the day. Please keep in mind that what works for us might not work for you. Thanks for the response!
Hi,
Your diagram shows the Victron shunt installed between the truck ground and the camper’s ground. That only measures current coming from the truck. Shouldn’t your diagram place the Victron shunt at the ground terminal of the battery, so all current in and out of the battery goes through the shunt?
BTW, I too built a very similar system but used the CTEK D250SA instead of the Redarc you selected. Another difference: I used the Bogart Engineering battery monitor instead of the Victron. I’m always surprised that more people don’t use DC-DC converters for charging. I bought my camper used and it has super long 10 gauge wire between truck and camper. Without the DC-DC converter it had so much voltage drop the alternator didn’t do much, if any, charging of the camper.
Cheers,
Dave
Hello, thanks for the comment! I wired the shunt according to figure 3 of this diagram: https://www.victronenergy.com/upload/documents/Quickinstallsheet_BMV70x_part1_2.pdf
It seems to capture all currents in and out of the lifepo4. I have monitored it pretty closely and I haven’t noticed anything not being captured. When the truck is running I see near to 40 amps coming in to the lifepo4 from the Redarc. When the truck is not running I see what the solar panel is capturing. I also see the loads inside the camper when the fridge is running or I turn on a light, so I believe it is wired correctly.
I’m glad to hear your system is working out well for you! I had not heard of the Bogart Engineering monitor before, I will have to take a look. Thanks for the comment!
Hello Dave
I just purchased a REDARC DCDC converter and I own an old Bogart engineering battery monitor TM-2030. How did you connect your CTEK with the trimetric? How similar is your system to the “over the land we go” system? The +81 red positive power line from the battery to shunt is connected how exactly?
thanks ahead of time,
Will
Hi Will,
My system is connected roughly similar to OverTheLandWeGo’s diagram except I used different brand components, connected my solar panels to a BlueSky controller (it was part of the existing system when I purchased my used truck camper) and installed more circuit breakers. The extra breakers allow me to isolate any one piece of the system for easier diagnosis or repair of problems.
The Victron and the Bogart battery monitors both have identical inputs (i.e. they both connect to both sides of the shunt, ground, and two supply voltages) but they physically attach in a different way. The +81 you mention is actually “+B1”, i.e. the camper’s 12v battery. It’s supplies power to the battery monitor and is the main voltage shown on the batter monitor. B2 on a camper would typically attach to the truck battery so it too can be monitored. Monitoring the second voltage is optional and not particularly useful in my situation.
I suppose a diagram and photos of my system would be helpful, but unfortunately I didn’t do it. And now I’m temporarily laid up and can’t walk!
Dave
Hi,
If the Victron shows all the current going in and out of the battery then you wired your camper like the diagram on the Victron page. But if you look at fig 4 on the victronenergy.com page you’ll see it doesn’t match your diagram. Specifically, the system ground for all the loads should attach to the shunt on the opposite side of where the battery attaches — otherwise the shunt won’t see their current flow. In other words, your diagram should show one end of the shunt attached to the battery and the other end of the shunt attached to all your system loads, including the truck.
One more thing, your diagram shows a floating (i.e. not connected) ground wire from the Redarc. Shouldn’t that green wire be attached to system ground? It’ll work either way, but for safety reasons it’s best to have the ground wire (which probably only attaches to the case) connected to a 0 voltage reference. Otherwise a failure in the Redarc which shorts the case to an internal high voltage could create a dangerous situation.
The Redarc is more effective than the CTEK I purchased. I only see a max of ten amps or so when driving. But then I don’t have bluetooth so it’s hard to monitor when I’m driving!
Happy Camping,
Dave
Thank you!!! I see what I did wrong. I verified the wires in the camper were correct and that it was the diagram that was incorrect. I have went ahead and updated that.
The green wire is actually a charging selection wire for the Redarc. I’m glad that you pointed it out because to set the charging profile to LifePo4 you must connect that wire to the orange wire of the Redarc. I think it’s all good now, thank you for pointing out those flaws!
I love the bluetooth feature of the Victron BMV-712. I find it a lot of fun to be able to see what’s happening with the battery from wherever I am around the camper or in the truck. As I get more used to the system and finding it to be reliable I am looking at it less and less though.
Thanks again!
How are you monitoring the solar input with this setup? Always helpful to know positioning and how much juice you’re harnassing. Thanks!
Hi Ryan,
I monitor the solar input with the Victron app through my phone. Its super easy to use.
Great info! Can the solar and the truck be hooked up to the camper at the same time?
I’m looking into adding solar to my ATC, as it’s pre wired and I’m looking at a kit. But can they both be hooked up at the same time?
Hi Dylan –
You’ve probably already figured out your setup (sorry for the delay). Yes, our Redarc allows us to have the truck and solar hooked up to the camper at the same time. Let us know if you have any other questions.